Silksong Whispering Vaults walkthrough
How to complete the Whispering Vaults in Hollow Knight: Silksong.


The Whispering Vaults in Silksong act as a library, full of dusty crates, pesky Scrollreader enemies, and a single mysterious Vaultkeeper whose help you'll soon need. It's also the Whispering Vaults where you acquire one part of Silksong's Threefold Melody - the Vaultkeeper's Melody - which will ultimately grant you access to The Cradle.
To help you with navigating the puzzling area and grabbing every upgrade hiding away amongst its shelves, here's our Silksong Whispering Vaults walkthrough.
Silksong Whispering Vaults walkthrough
If you've been following our Hollow Knight: Silksong walkthrough so far, you'll have just explored the Cogwork Core, completed the Architect's Melody, and completed the gauntlet that allows you entry into Whispering Vaults finally. This means that it's now time to complete the Vaultkeeper's Melody, so let's get going!
Unlock the Songclave shortcut
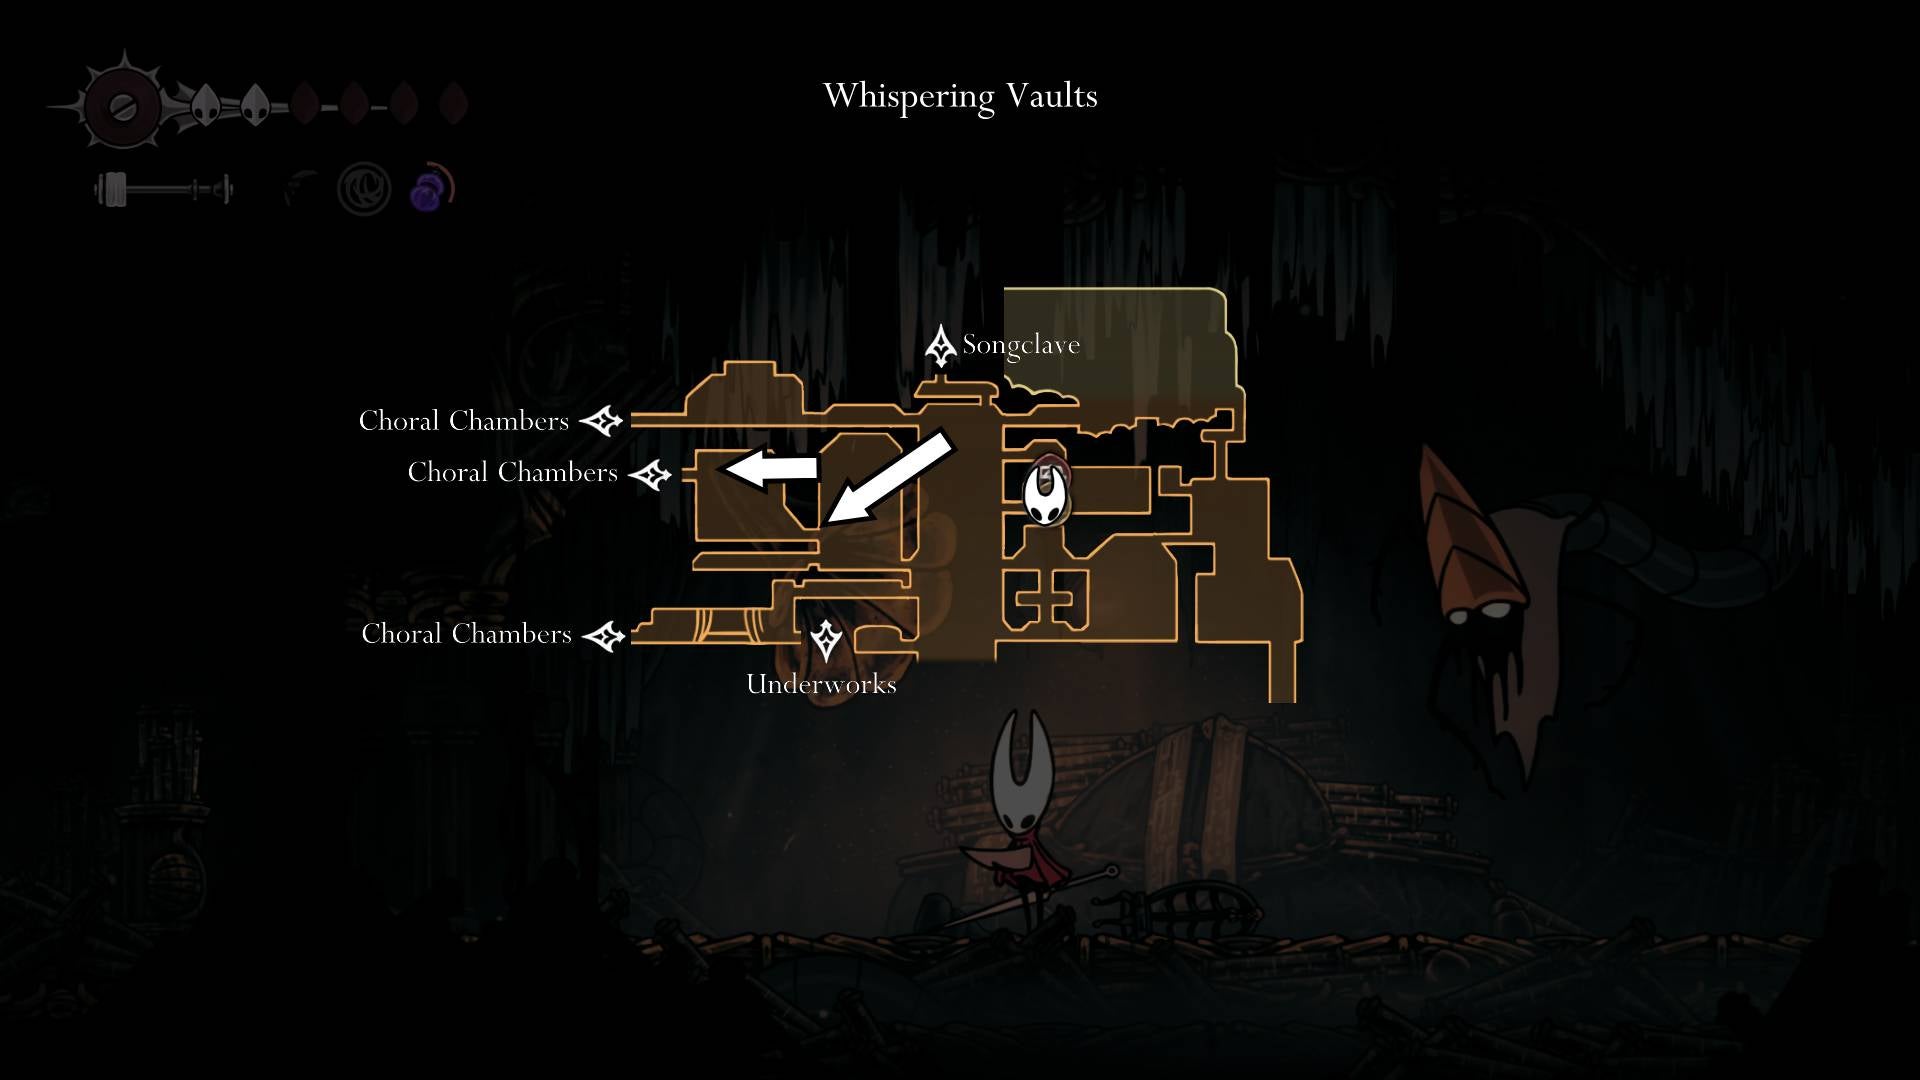
From where you completed the gauntlet at the entrance to Whispering Vaults, head right, jump down, and exit to the right. Now, you are officially in Whispering Vaults.
First things first, we're going to unlock a shortcut up to Choral Chambers' Songclave, collect the Whispering Vaults Map, and unlock a Bench for the area.
Keep heading right into the next room, where you'll have your first encounter with a Scrollreader enemy. Head right past him and look at the ceiling; there's a hatch that's slightly ajar that you can attack to head upwards.

In the next room, head left and attack the wooden beams to reveal another upwards passage. Go up, and you're officially back in Songclave! Nice.

Unlock the Map
After unlocking the Songclave shortcut, hop back down into the Vaults and head left before exiting. Here, you'll find a device that will give you the Whispering Vaults Map in exchange for 70 Rosaries. Pay up!

Meet the Vaultkeeper and unlock the Bench
With the Map collected, navigating this place will be much easier. From where you unlocked the Map, head downwards into the tall chamber shown on your newly-acquired map.
If you look at your map now, you should see two exits along the upper right-hand side of the tall chamber. We ultimately want to use the second exit (the lower one), but there are a few hurdles along the way first.
From where you fought the Scrollreader, jump down. You'll quickly run into an Lampbearer enemy who you want to Clawline or pogo off of to reach the platform just above him (shown below).

Keep right along the platform to find an exit with a lever below it. Through this exit, there's a breakable wall leading to a Silkeater for you to grab if you fancy, but take caution of the Vaultkeeper enemy that spawns upon leaving.
Once that's done, exit the room and attack the lever below you to access more of the tall chamber.

Keep heading downwards and you'll arrive at an exit with a Vaultkeeper sign on it. Exit, and in the following room, go upwards and left to reach the Bench.


You'll hear the muttering of a very important NPC nearby… But first, head to the far-right corner of the room to grab a Psalm Cylinder. This will come in use shortly – mainly because it will make Vaultkeeper Cardinius finally appear back near the entrance to the room!


If you've already collected a Psalm Cylinder before this point, Vaultkeeper Cardinius may spawn for you as soon as you enter the room; don't forget to grab the Bench before leaving!
Hand over the Psalm Cylinder to Cardinius and he'll be able to play it for you. This applies to all Psalm Cylinders that you find around Pharloom, so be sure to pay Cardinius another visit if you find any more. It also just so happens that Cardinius will be the one teaching us the Vaultkeeper's Melody, but only once we have retrieved a very special Cylinder a little later on in Whispering Vaults, so make a note of this location!
You can now exit the room and return to the tall chamber, which we'll be continuing to descend.
Collect the Memory Locket
One thing to note before exploring the rest of the tall chamber is that there are movable crates throughout the place. You'll be able to identify which ones are movable – and the direction that they'll move in – by looking at the tracks they're attached to.
To continue descending this chamber and collect some of the items in Whispering Vaults, you'll need to spend some time hitting and moving these crates to create new pathways. These crates can also carefully be used to kill enemies…
After exiting the Vaultkeeper's room, continue descending until you reach the 'bottom' of the room; there'll be an exit on either side, as well as a trapdoor below you that you can't open just yet. From the trapdoor, jump up and attack the crate to unlock a shortcut.

You can now jump back down and exit the room to the right. You'll arrive at another movable crate, but this one needs hitting from beneath it to proceed. We'll do that shortly. For now, keep right.
The next room contains a lot of nothing, but our goal is to ultimately reach an exit in the top right-hand corner of the room, using the movable crates to get there.
First things first, go right until you see the tracks for a crate; follow them downwards and left. Hit the crate so it moves right, then go downwards again.
There'll be a second crate here that you can hit to move it to the right. You can then use this crate to hit the underneath of the first crate, sending it upwards towards the exit we need to reach.


Platform your way up the room and to the top of the first crate, that you'll now have moved to the top of the room. It might look like there's no exit here, but if you jump over to the top-right corner from the crate, you'll find a hidden passage. Exit the room.

In the next room, climb upwards and keep left to enter another room. Again, keep heading upwards to find a Rosary Cache and a Memory Locket.

With that done, it's time to go and rescue our first lost Flea for this area.
Rescue the first lost Flea
Exit the room containing the Memory Locket. Now, a word of forewarning: this room is a bit of a maze. We ultimately want to go to the bottom of it and hit some levers that create an updraft which allows us to go upwards and back into a new part of Songclave (where the lost Flea is).
However, you want to be very careful to not go too far downwards, or else you'll end up falling down into Bilewater… While I recommend exploring this portion of Bilewater at some point or another – to unlock shortcuts and collect the Twisted Bud item needed for one of Silksong's endings – I do recommend coming back here later if you haven't yet been to Bilewater. It's a horrible place, honestly.
Housekeeping out of the way, let's crack on with rescuing this Flea. From the room containing the Memory Locket, jump down onto the ledge on your right. If you look up, you'll see some barriers blocking the path upwards; these are what we need to go and unlock next.
Keep right and Clawline onto the hook here; it'll reveal a downwards passage that you'll want to carefully glide or jump down, avoiding the moving cogs along the walls and floor.

Following the moving cogs, you'll be entering a tall passage coated in spikes that you'll need to carefully glide and wall-jump down. It is very important that you keep to your left in this passage, where you'll need to wall-jump past a falling boulder (pictured below). Otherwise, going (or falling) downwards will land you in Bilewater…

After the falling boulder, keep platforming to your left and upwards – past the cogs – to reach a silver lever. Hit it to create a bridge over to the left-hand side.

Head left and carefully platform downwards past the spikes to come to another lever, as well as a pedestal you can stand on. Attack the lever to reveal a draft, and stand on the pedestal to finally get rid of the barriers that were blocking our path upwards earlier.

You know what to do next: glide up the draft and hit the lever at the very top.
In the next room, continue upwards to enter a new section of Songclave. In this area, head left – past the Choirbug enemies – to reach a room containing another Psalm Cylinder, as well as a shortcut back to the very beginning of Whispering Vaults. Don't leave just yet though, as we still have a lost Flea to rescue.

Head right and use the platform near the beginning of the room to jump onto the walls. Climb up, and you'll soon see some Clawline discs you can hook onto (pictured below).

Use the discs and the upcoming walls to platform upwards, and you'll soon arrive at the sleeping lost Flea. Attack them to send them back to the Flea Caravan!

Finally, we're done here, but we're not at all done with Whispering Vaults yet…
Collect the Mask Shard
Use the shortcut you just unlocked to enter the Vaults' tall chamber again.
Next, open your map and look at all of the exits along the right-hand side of the chamber; we want to go through the third exit from the top (pictured below), which we'll have already been through earlier.

This exit leads us to the room with the crate in the floor. Exit to the left again, and rather than aiming for the top-right corner this time, head downwards and exit via the bottom-left corner.
You'll arrive in a hallway full of Scrollreader corpses. It might not seem like there's anything in this room, but hit the ceiling in the very middle to reveal a shortcut leading upwards. Go up.

You'll now find yourself in a tiny, dark room, but guess what? The crate from earlier is now directly above us! Attack it to send it upwards, then go up after it. You can now use the crate to climb upwards and collect a Mask Shard.

We are now officially done with the western half of the Whispering Vaults, but we still have the eastern half to go. Fortunately, there's a little less to do there, but we do have one more lost Flea and Cogheart Piece to find, as well as a very fun boss to try and tackle.
Rescue the second lost Flea
From the Mask Shard, jump back down to the very bottom of this area and into the hallway with the Scrollreader corpses again. Exit to your left to find yourself in the Vaults' tall chamber, but this time, we're a little further down than before.
If you head left and upwards past the Lampbearer enemy (and the room with a signpost outside of it), you'll arrive at a lever; attack it to unlock a shortcut up to the rest of the chamber.

From the lever, jump up and exit to the left. In this next room, we want to ultimately reach the top left-hand corner to rescue our second lost Flea. There's yet another movable crate puzzle we need to solve to reach them though…
Go left and upwards, then right – past the Scrollreader – to reach your first crate. You don't need to move this one and can instead use it to reach the platform above it.

From the crate, use the Faydown Cloak, Cling Grip, and Clawline to head upwards. Hop onto the platform to your left, being careful of the Drapemite enemy that spawns. You'll arrive at a second crate; hit the left side of it so it moves to the right, then go and hit the underneath of it so it moves upwards.

Platform up to where the crate has moved to, and hit the right side of it this time, moving it to the left.

Again, follow the crate and hit the underneath of it to send it upwards. You'll no doubt see exactly where this particular movable crate puzzle is going now…

Climb up the wall to your left and hit the left-hand side of the crate. You can now Clawline onto it, but be careful of the Drapefly enemy that'll now appear here! From the crate, jump over to your right to find the lost Flea trapped inside of a cage. As per usual, attack him to free him!

We're not finished with this room just yet! Jump back down towards the bottom of the room next.
Collect the Pale Oil
If you look at your map, you should see an exit on the left-hand side of the room. Go through here next.
Would you look at that? There's yet another movable crate puzzle in this room for us to go about solving, but it's very worthwhile.
Start by hitting the crate in the bottom left-hand corner of the room. It'll reveal a passage upwards, allowing you to hit a second crate on your right (pictured below).

Jump down to ground level and hit the crate on the floor in the middle of the room. Jump on top of this crate and then use the Faydown Cloak to double-jump between the two stacks of crates above you.

Hit the crate at the top – between the two stacks – to continue ascending upwards. Climb up the wall on your right and head left, arriving at another crate you can hit.
Follow this crate to the left and you'll arrive at what seems like a dead end… until you hit the crate below you (pictured below)!

Go downwards and hit the crates on your left. The first one won't budge, but the two crates above it will move to the left, allowing you to continue.

Next, go beneath the crates you just moved and hit the underneath of them to send them upwards. You can now go left to reach a silver lever.

Exit into the following room where you'll be able to retrieve a pot of Pale Oil finally. This is an important item you can give to Pinmaster Plinney in Bellhart to receive an additional Needle upgrade, which can make a huge difference against Pharloom's many enemies.

Unlock the shortcut into Choral Chambers before exiting. We now want to return to Whispering Vaults' tall chamber, where we have two more rooms left to explore.
Remember the signposted room on the left-hand side of the tall chamber from earlier that we didn't go in? We don't want to enter that room just yet, but we do want to enter the room beneath it.

Collect the Cogheart Piece
This room contains another one of Silksong's memory puzzles.

Stand on the pedestal in this room, and a tune will be played using the seven bells here. You need to memorise said tune and attack the bells in the correct order. Do this three times and you'll be rewarded with a Cogheart Piece, which will come in handy later on in the game!
Next, we can finally enter the signposted room we've been avoiding… You can no doubt guess exactly why we've been saving it for the end of this Whispering Vaults walkthrough.
Defeat Trobbio
Inside the signposted room finally, keep going left. You're currently above The Stage, which is where you'll be fighting against Trobbio shortly, and there's a little lore to read along the way.
At the end of this passage, hit the lever to unlock a shortcut into Choral Chambers. If you plan on attempting Trobbio right now, I also highly recommend going and resting at Choral Chambers' Grand Bellway Bench, as this is much closer to Trobbio's arena than the Whispering Vaults Bench.
When you're ready for one of Silksong's best boss fights, go right of the lever to find yourself playing a special role in Trobbio's spectacular performance; a role in which you ideally need to kill him.

If you're having any trouble taking Trobbio down, take a look at our guide on how to beat Trobbio in Silksong. Once the performer has been felled, you'll be able to retrieve the Claw Mirror Blue Tool from his body.

We now have just one more thing to do before finally being free of the Vaults, and that's learning the Vaultkeeper's Melody.
Collect the Sacred Cylinder
After defeating Trobbio, we need to go and grab the Sacred Cylinder. This means going into a new section of the Underworks (that is only accessible after defeating Trobbio). Fortunately, the path forward isn't too troublesome if you can steer clear of Pharlids and spike traps; two things you're no doubt used to by now.
Head right of Trobbio's arena and attack the lever above you to unlock a shortcut. After that, hop down and keep heading right into a new room. You'll arrive at an elevator; hop inside and hit the lever to descend.

At the bottom of the elevator, you can hit the lever on your left to unlock a shortcut into the Underworks. We don't want to head that way right now though. Instead, hit the elevator to send it upwards but do not ride it; go beneath it, where you'll need to carefully platform along a spiked passage.

In the next room, we've even more spikes to navigate, as well as lots of Pharlid enemies to avoid. Your goal is to use a mixture of Cling Grip and Clawline to platform over to the top right-hand corner of the room, where there'll be some wooden beams for you to destroy (pictured below).

In the next room, you'll find yourself in a secret part of the Exhaust Organ. If you've defeated Phantom, the steam jets here will fortunately have stopped working, making this area much easier to navigate. Otherwise, you'll have to carefully avoid the steam jets, or come back after defeating Phantom.
Our goal with this next room is to keep climbing to the exit at the very top of it while avoiding any spike traps along the walls or floors.
Once you exit at the top of the room, you'll find yourself back in Whispering Vaults finally. Head left and stand on the pedestal to reveal a hidden room which contains the Sacred Cylinder. Pick it up!

You can then exit this room to the left.
Learn the Vaultkeeper's Melody
With the Sacred Cylinder in your possession finally, return to Vaultkeeper Cardinius and give it to him.

You will then be taught the Vaultkeeper's Melody – by playing it on your Needolin – and can bid farewell to the Whispering Vaults, aside from that one section that leads to Bilewater if you're yet to explore there… Good luck.
To continue with Silksong, you want to pay a visit to High Halls to learn the Conductor's Melody next.
For more on Hollow Knight: Silksong, take a look at our list of all bosses, where to find all lost Fleas, and how to get all Needle upgrades.
Read this next
- Hollow Knight: Silksong's latest patch is here, but you're out of luck if you were hoping it might go easier on you
- Hollow Knight: Silksong devs admit it has "moments of steep difficulty" but also a "higher level of freedom" to avoid getting stonewalled
- Hollow Knight: Silksong's second patch detailed, but don't expect any balance tweaks